
PATCAM 2010
Welcome To Cut Copy Paste, a step by step guide to totally customize Blogs. Whether you're wanting to build a website or just a really cool blog, I can show you some easy ways to get started.
Feel free to leave suggestions or comments to help make this site better in the Shout Box below.
 Adding Playlist Lesson:
Created By:
PATCAM
Web Designs
Oklahoma City, Ok.
Serving the State of Oklahoma and beyond.
P.W.D. is dedicated to helping small businesses get their products & services on the Internet. We can custom build a website that caters to your needs
and the needs of your customers.
We understand the complexities of Internet Coding and work out all the red tape, so that when you or your customers are ready, you can enjoy all the benefits
of having your very own Website.
We Build:
Websites
Order Forms
Employee Applications
Photo Galleries
Video Productions


PATCAM
Recommends:

Opera Web Browser
|
As Requested: Q. How do you put the comments at the top of each post?
A. A blogger was wanting to know how you move the comments from the bottom to the top of each post. Here is an example: 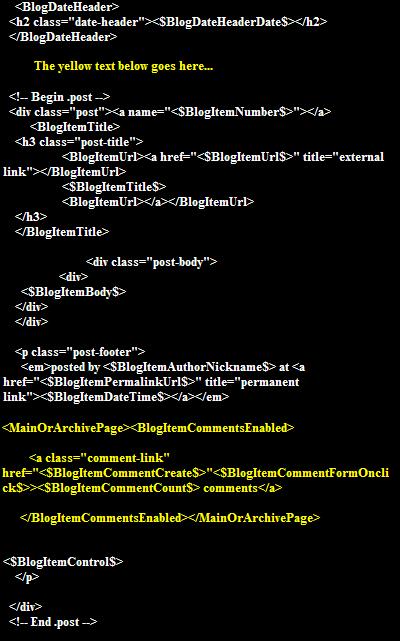 Everything that is yellow code needs to be moved up to where the first bit of yellow text is, if you have any more questions, feel free to comment.
Template Anatomy 101: Section 1
Template Anatomy 101 is going to be about the "Minima" type code that Blogger Provides you with. I will show you how to break down parts of the code and alter them to give your blog the look you want. Change The HeaderLook up, notice that the heading of this page has been changed. Here's how you do it... In your blogger template, about half way through the code you will find text that looks like this: 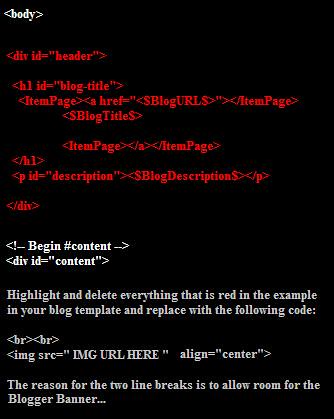 If you need help making a picture an actual URL See Lesson 4b.Remember, your blog header should take up a good portion of width. You may have to alter your images with your "paint" program to get them exactly how you like them before uploading. I built an "Example Bloggy" made out of the "Minima White" pre-made Template. Click here to see it.
Lesson 11: Line Breaks
There are three different ways I use line breaks, I will show you all three in examples, of course... 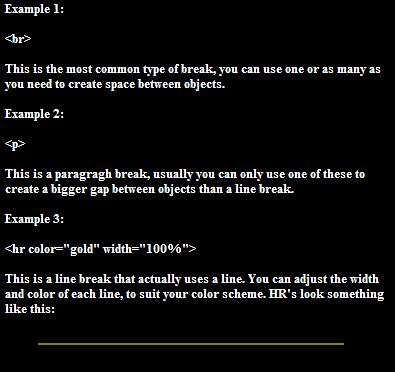 Note: I find that if you are starting a page from scratch on Blogger, you should put at least two BR's above everything else as to create a space for the Blogger Navbar.
Message From The Editor...
Alright so I have applied a few of the Lessons to a page for two reasons. One so I could Unblog this blog for easier reference and two so I could show you what else you can do with blogger space. It's kinda like my version of a very FREE Website. Presenting: Cut Copy Paste "Unblogged"
Lesson 10: Alter Your Images
Get to know your "Paint" program. You should have this on your computer from the time you bought it. In your Pictures folder on your computer find the image you want to alter. Then right click on that image and select 'open with' which will pull down another menu, then select 'Paint.' When the new window pulls up there will be several tools on the tool bar to alter images (have fun), or if you get bored you click 'file' and start a 'new' image. I make most of my buttons from scratch, there's really no science, just kinda like drawing in virtual-world. Don't forget to check out all the options on the upper toolbar also. There are tools to stretch/shrink pictures, or zoom-in so close you can see Grandma's nosehairs (you might delete those while editing). When you get through with all that, SAVE! Remember where too, because you are going to need to upload this image to Flickr to get it on your page... Refer to Lesson 4b on this page to learn how to get your images URL from Flickr so you can apply it to your page and always feel free to comment.
Lesson 9a: Font Backgrounds
If you have a background on your page that varies in color, you may need to add a background color to your font, so that all your text is visible. Not every browser makes a page look as it looks on your screen. To get the text to look like this:Just add the following code.  Remember, you can change the hexcode colors to whatever you want them to be. If you have any questions leave them in the comment area. Note: This code may not work with Firefox.*
Lesson 9: Font
So, in the body code, we used text to define what color the text that was standard in the document was going to be. However, changing text that IS within the document is a little different. To get your text to look like this: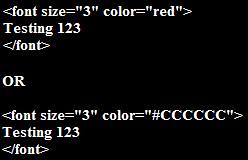 Notice also that there is a size attribute, this number is in pixels. Tinker with it to make your text BIGGER. The same thing applies with the font as well, you can either use the color hexcode chart, or just type in the name of each color (be exact). Hexcode Color ChartColor Spelling Examples
Lesson 8: Background Properties
If you have decided to use a URL as a background, you can "fix" the background to stay stationary, while the text, links, etc. scroll over the background. The body tag should look like this:  bgproperties="fixed" If you have any questions, feel free to comment. Note: This code does not seem to work well with Firefox (I always suggest against the use of Firefox due to security issues, but this is one more reason).
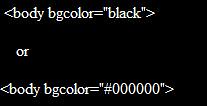
Lesson 7: Background Colors
Background Colors: There are two ways to use background colors as opposed to URL backgrounds. There is an endless array of colors to choose from if you want to use the hexcode chart, or you can just type in the name of each color (chart provides exact spelling). Here is an example of what either code looks like:
 Now that you have your background figured out, it's time to figure out what text is going to look best. You can set a standard text color, as well as have a different color for links and another different color for links you have already been to. Here are how the codes should look in your script:  text - Standard Color for entire page. link - Color for text that is to be a link. vlink - Color for links on your page that have already been visited. alink - Color for current selected link as you click it.
Lesson 6: Using Images As A Background
Angelfire's Background LibraryAngelfire has an excellent gallery of background tiles that -to me- are suitable for most tastes. Scan through the gallery and find a background that you like. Right-click on that particular image and select 'save picture as.' Go to your Flickr account and upload that image. When you finish saving, go back into 'yours' (at the top of Flickr's page) and select the new image you have uploaded. On the right side of the page is an option called 'different sizes,' select this and it should take you to a page where you can see the "URL." Highlight the address by left clicking and dragging a edit field over the whole URL. Right-click and select 'copy'. Now that you have the code in your copy feature, go back to your blogger template. In the HTML code there is a line like this:  Change the code if you have to, sometimes instead of saying 'background' in the script it will say 'bgcolor' with a series of numbers an a pound sign. In either event, change the contents of the parenthesis to the URL from Flickr and be sure that it says 'background' and not 'bgcolor'. An easy way to replace that which is in the parenthesis is to highlight the old address, right-click and select 'paste,' this will automatically erase the old text. Preview what your new background looks like and if you like it, save it. Note: make sure the code is exact, one flaw could cause the whole page not to work correctly...
Lesson 5: Using An Image As A Link
Make images links on your page. If you have any questions leave them in the comments area. Here is the example: 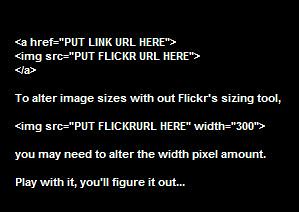
CCP - Networked Blogs on Facebook
|
|