
PATCAM 2010
Welcome To Cut Copy Paste, a step by step guide to totally customize Blogs. Whether you're wanting to build a website or just a really cool blog, I can show you some easy ways to get started.
Feel free to leave suggestions or comments to help make this site better in the Shout Box below.
 Adding Playlist Lesson:
Created By:
PATCAM
Web Designs
Oklahoma City, Ok.
Serving the State of Oklahoma and beyond.
P.W.D. is dedicated to helping small businesses get their products & services on the Internet. We can custom build a website that caters to your needs
and the needs of your customers.
We understand the complexities of Internet Coding and work out all the red tape, so that when you or your customers are ready, you can enjoy all the benefits
of having your very own Website.
We Build:
Websites
Order Forms
Employee Applications
Photo Galleries
Video Productions


PATCAM
Recommends:

Opera Web Browser
|
How do I remove the NAVBAR on Blogger?
 Want to see your blog completely free of any content that was not developed by you? Is that NAVBAR the only thing you cant seem to get rid of? I have a code for that. Here is the code: Now, where to place it. Go to your Layout or Template in your blogs dashboard and then to "Edit HTML." Find the area of the HEAD of the script that looks like this:
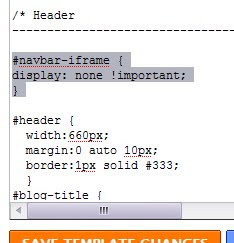
Install the code from above and then preview. If you are looking at the Preview for your page and the NAVBAR at the top is gone, you're set. Go back to the editor and Save your Template. If in the event that this didn't remove the bar, DO NOT save, leave the editor and come back before trying again. This will eliminate the chance that you may have placed the code in the wrong way thereby creating errors in your script.
How do I add the Facebook Fan Box to my Blog?
If you have already established a page for your blog on Facebook, you can now go to "Edit Page."  Then choose the Promote with a Fan Box link about half way down the page. 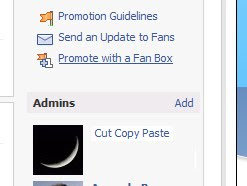 This will take you to an editor that will quickly add or remove any of the content you may want to display on your page. 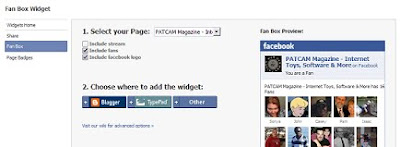 You can add the Box as a widget by clicking the Blogger button and this will advance you through the widget app. If you want to take the script and place it as you see fit, read on. 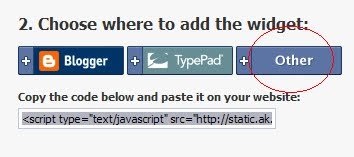 The other method, the pro's choice method, is to click the "Other" tab and get the root code itself. After you've chosen which items you want to appear in this box, go to your page editor that you use to alter your blog, for example; Dashboard/Template/Edit HTML. 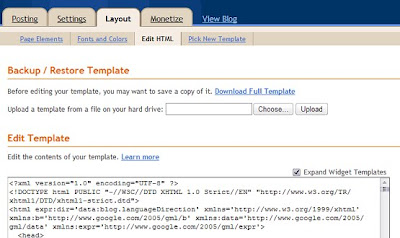 Find the part of the script, just below the <Blogger> element and place the code you got from Facebook. NOTE: this is how you add to the OLD blogger template, keep reading for the Newer widget template. 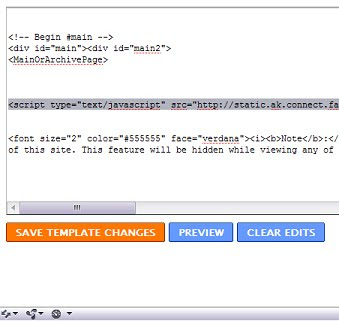 There are two different Template editors now so, if you've upgraded to the newer Template, use this pic to reference the codes, the template that uses widgets is much more complicated, but here is the example: 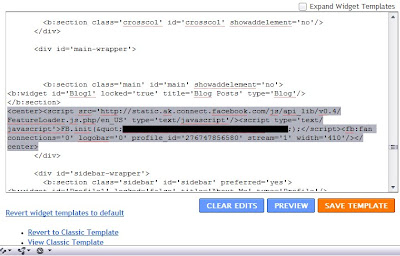 Preview before you save is always recommended, and don't be afraid to mess with the width=100 attributes in any of the codes to get it to that perfect fit. Before you know it you will be an avid script editor!!!
How do I put an iFrame on my page?
Example:Dictionary | Phone Book, Click one of the links to change the iFrame Think of an iFrame as a webpage within a webpage. You can use this element for any website, for example, you could have Google as an iFrame, and utilize the Google front page on your page. Having several different resources available on your front page not only makes your site useful to users, but useful to you!
Another awesome feature about this element is that not only does it display an external website on your page, you can also make links that "target" the iFrame instead of navigating away from the page. This works great when compiling different sources of media content such as news in one iFrame and weather in another. The code that installs into the "body" of your document looks like this: <IFRAME SRC="http://www.youraddress.com/" TITLE="IFRAME1" SCROLLING="auto" NAME="frame1" WIDTH="500" HEIGHT="150" ALIGN="center" FRAMEBORDER="yes">
</IFRAME> This is the address you want to be default when you load the page. Give each individual iFrame a title. The name of the iFrame will become relevant if you are trying to make links on your page that navigate through the iFrame rather than navigating away from the page. When you make a link to navigate the iFrame, use the name of the frame you are triggering to change; target="frame1" Example: <a href="http://www.youraddress.com/" target="frame1"> Link Name</a> Scrolling="auto" or "yes" or "no" controls whether or not there will be scrollbars visible in the iFrame.Frameborder controls the border of the iFrame if you want one. You can also use the height and width attributes to control the size. Be sure to define with "align" how you want the iFrame to sit on the page; left, right or center. Ok go have fun!
How do I cut, copy and paste?
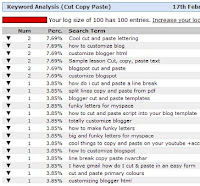 I have been seeing this question come in many different forms while on the the statistics tracker, so I have decided to make this post and link it to the main page so that hopefully I'm making this a little easier on somebody to find. Something to keep in mind before we get started is that in Windows, there is what is refered to as a "Clipboard." When ever you make a body of text, you can drag a box over that text and manipulate it. 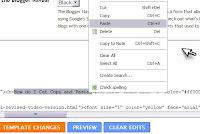 If you right click your mouse on the text you've highlighted, a menu pops up with several options. Though there are many different things you can do from these right click menus, we are just covering these three. The following are the functions of each option, and alternate ways of executing the commands without right clicking, ya know so I can turn you into a true pro...
"Cut" remove the selected item but save to clipboard. Ctrl X
"Copy" the selected area to the clipboard, without removing from the document. Ctrl C "Paste" the item you saved to the clipboard to the document you are editing. Ctrl V When you cut and paste, where is it saved?Note: each time you Copy or Cut something new, it automatically replaces the other data you had on the clipboard. This right clicking will become addictive, if you've not been used to it before, prepare to use the force. Try to right click on a picture and then "save the image." This is where it starts getting iffy. You should always make sure that the stuff that you are using is not used in a way that could be construed as Copyright Infringement. I am no medium on these rules and regulations so I won't even begin to sort what's ok, and what's not. It's not hard to figure out though, and if you know how to be original, you won't worry too much about these rules. There are so many more options when right clicking, but at least now that question is resolved. Cheers!
Lesson 23: Custom Search Engine Script

Narrow down the web pages you want to search when you install this Search Bar on your blog or website. You will of course have to alter the URL highlighted in red, change this to the URL you want your search to stay limited to. I have used a background image in the text box itself and altered the colors, these can be edited to your liking. <form method="get" action="http://www.google.com/search">
<input type="text" style="background-image:url('http://i612.photobucket.com/albums/tt203/americaneagletowinginc/tablrbale2.jpg'); color: #cccccc; font-weight: bold; font-size: 10pt;" name="q" size="31"
maxlength="255" value="" />
<input type="submit" value="Google Search" />
<input type="radio" name="sitesearch" value="" />
The Web
<input type="radio" name="sitesearch"
value="http://htmlhelper.blogspot.com/" checked /> Ask PATCAM<br />
</form>
You can change the green highlighted letters to what ever suits your page theme. If you prefer another search provider, you can simply change the domain name to your favorite search engine. Google's the best though, so you won't need to change, right? Right!
Lesson 22: Display Contents On The Main Page Only
You may have noticed how certain elements of your blog disappear when you navigate away from the main page. This is caused by a small attribute, and it can be utilized for other things. For example, if you want the big picture of the scenery you photographed while out nature hiking to be the primary focus to the viewers that load your home page, but you don't want it to be in the way when they navigate to other posts, simply add these tags around the content you want to be hidden when the viewer moves on from the home screen: <MainOrArchivePage> Content to be hidden and all coding for elements, etc. here </MainOrArchivePage> Note that anything that is wrapped in a table must be either inside these tags, or use the tags inside of the table, widget, etc.
CCP - Networked Blogs on Facebook
|
|


